guides
How to Set Up a Wick System for Hydroponics
Build a wick hydroponics system in 30 minutes using cotton wicks, coco coir, and nutrient solution. The simplest passive setup for herbs and small plants.
 Priya Anand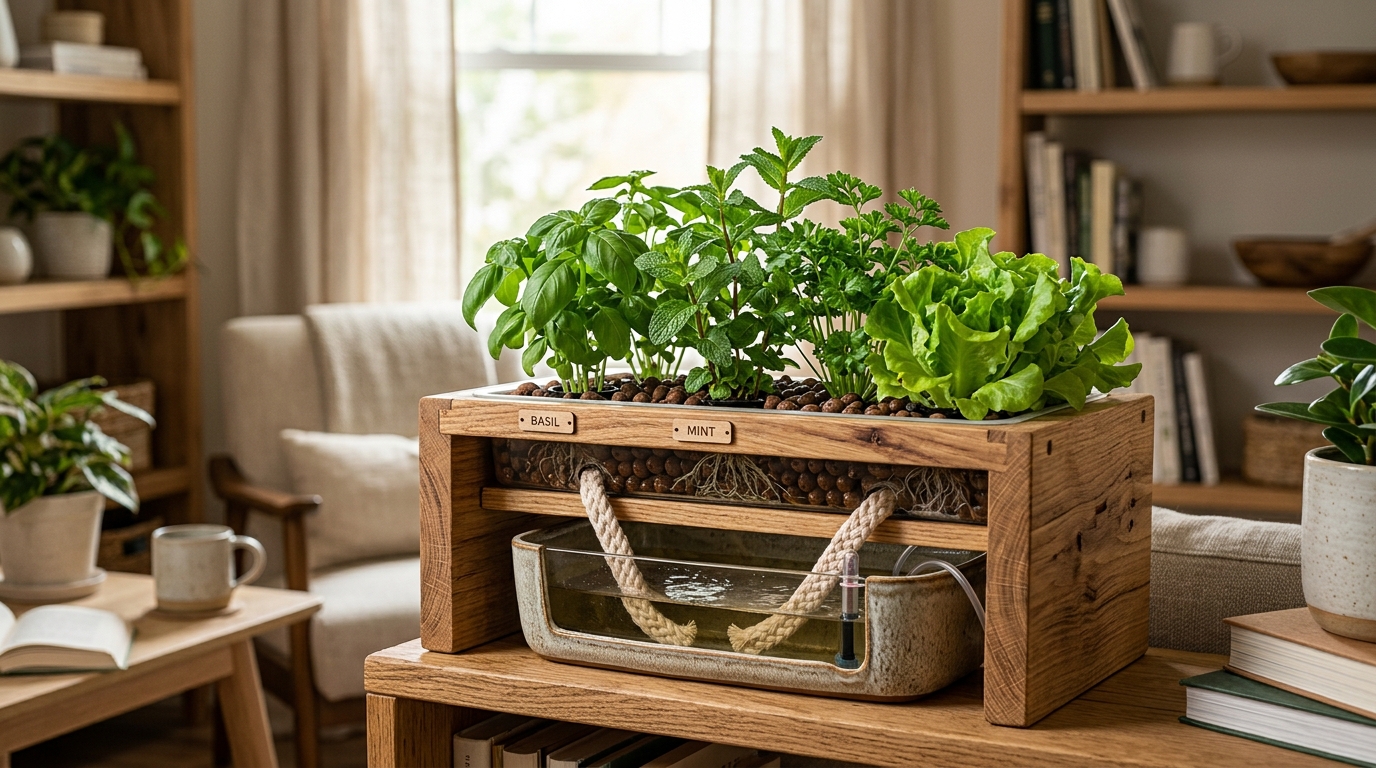
To set up a wick hydroponics system, place one or two cotton or nylon wicks through holes in the bottom of a container filled with coco coir, then suspend it above a dark reservoir of nutrient solution (pH 5.8–6.2, EC 0.8–1.5) so the wick tips sit fully submerged. Add herbs or seedlings, put the setup under a grow light for 14–16 hours per day, and top off the reservoir every 5–7 days. No pump, no electricity needed for the reservoir.
What is a wick hydroponics system?
A wick system is the simplest of the six main hydroponic methods. It has two components: a growing container filled with an absorbent medium and a reservoir of nutrient solution sitting below it. One or two pieces of cotton rope or thick nylon cord pass through holes in the bottom of the growing container, down into the reservoir. The wick draws nutrient solution upward by capillary action — the same mechanism that makes a candle work — delivering steady moisture to plant roots without any moving parts.
The main difference between a wick system and the Kratky method is that Kratky plants grow roots directly into the nutrient solution, while wick-system plants grow roots into the medium and receive nutrients via the wick. Kratky delivers nutrients faster because roots have direct access; a wick system delivers nutrients more slowly and steadily. For slow-growing herbs and compact greens, this is an advantage — roots stay evenly moist without the risk of sitting waterlogged.
Where a wick system excels:
- Zero electricity required for nutrient delivery
- Extremely low cost to build ($10–25 in total materials)
- Forgiving for beginners who cannot check on plants daily
- Silent operation — no pump noise or bubbling
Where wick systems fall short:
- Delivery rate is limited by wick size and material — not suitable for large, fast-growing plants
- Wicks can become clogged with mineral deposits over time and need occasional replacement
- High-temperature environments (above 80°F) can push too much moisture through the wick and increase root rot risk
What you need to build a wick system
| Product | Best for | Rating | Notes | |
|---|---|---|---|---|
| Dark reservoir container (1 to 3 gallon) | Holding nutrient solution below the growing container | ★★★★★ | Any dark, food-safe container works — a dark plastic storage bin, an opaque bucket, or a painted mason jar. Dark walls block light from reaching the nutrient solution and prevent algae growth. Clear containers must be fully wrapped in black tape or foil before use. | Check price |
| Upper growing container (pot or bin) | Holding growing medium and plant roots above the reservoir | ★★★★★ | A 4 to 6 inch net pot, a fabric pot, or a plastic nursery pot with bottom holes all work well. The container needs 2 to 4 holes in the bottom for wicks to pass through. The growing container rests on top of or just above the reservoir. | Check price |
| Cotton or nylon wick material | Drawing nutrient solution from reservoir to growing medium | ★★★★★ | Thick cotton braided rope in the 3 to 5mm diameter range and nylon paracord inner strands are the most common wick materials. Synthetic nylon wicks last longer and resist mineral buildup better than cotton. Use one wick per small herb plant and two wicks for larger plants. | Check price |
| Coco coir and perlite growing medium | Wicking moisture efficiently while keeping roots aerated | ★★★★★ | A 50/50 mix of coco coir and perlite is the standard wick system medium. Coco coir holds moisture and wicks well; perlite keeps the mix from compacting and maintains air pockets around roots. Pure perlite works but dries out faster; pure coco holds too much moisture for most plants. | Check price |
| Hydroponic nutrient solution (single or two-part) | Providing all macro and micronutrients in dilute form | ★★★★★ | General Hydroponics MaxiGro is a single-part powder nutrient that dissolves cleanly with no sediment — ideal since undissolved particles can clog wick fibers. Mix at 50 to 75 percent of the label rate because wick systems deliver nutrients more slowly than active systems. | Check price |
| pH meter and pH adjustment solutions | Keeping nutrient solution in the 5.8 to 6.2 target range | ★★★★★ | A digital pH pen in the $15 to $30 range is more accurate than test strips for wick systems. Pair it with General Hydroponics pH Up and pH Down. Check and adjust pH each time you mix a fresh batch of nutrients and each time you top off the reservoir. | Check price |
Step 1: Prepare your containers
The reservoir and growing container need to be configured before adding any medium or wicks.
Set up the reservoir:
- Clean the reservoir with dish soap and rinse thoroughly
- If using a clear container, wrap the exterior completely with black electrical tape or aluminum foil — every gap allows light in and grows algae within days
- Cut or drill a small hole in the lid (if using a lidded container) for the wick to pass through — the hole should be snug around the wick but not so tight it compresses it
- Fill with plain water to test the seal before adding expensive nutrients
Prepare the growing container:
- If using a solid-bottom pot, drill 2 holes in the bottom for wicks — use a 1/4-inch bit for cotton rope
- Net pots with open mesh sides work without modification — thread wicks through the mesh
- The growing container should rest on top of the reservoir lid or in a position where the bottom clears the solution surface by 0 to 1 inch
Step 2: Cut and thread the wicks
Wick sizing and placement directly determines how much moisture the growing medium receives. Under-wicking starves plants; over-wicking keeps the medium too saturated and promotes rot.
Wick length calculation:
- Measure the depth of the reservoir plus the height of the growing container
- Cut each wick to this combined length, plus 4 extra inches
- The extra length ensures the wick tip sits fully submerged at the bottom of the reservoir, not just touching the surface
Wick placement:
- Thread one end of each wick through a hole in the bottom of the growing container — pull through until 2 inches of wick extend above the base of the medium
- Fan out the top end of the wick before adding growing medium — this distributes moisture across a wider area of the root zone
- Leave the lower end of the wick free to hang into the reservoir once the system is assembled
- For growing containers 6 inches or wider, use 2 or 3 wicks spaced evenly across the bottom
Priming new wicks: Before using cotton wicks, rinse them in plain water and wring dry. This removes manufacturing residues and opens the capillary channels. New nylon cord benefits from a quick soak and squeeze as well.
Step 3: Fill with growing medium
The growing medium supports plant roots and transports moisture from the wick to the root zone. A 50/50 blend of coco coir and perlite is the most reliable formulation for wick systems.
Preparing the mix:
- Hydrate dry compressed coco coir bricks in plain water first — one brick expands to fill roughly 2 to 3 gallons of medium
- Rinse and drain the hydrated coco coir to flush out natural potassium and sodium salts that can interfere with nutrient uptake
- Combine equal parts coco coir and rinsed perlite in a bucket and mix thoroughly
- Fill the growing container, packing lightly around the wick — do not compress tightly, as this reduces air pockets around roots
Starting from seeds vs. seedlings:
- Seeds: press 2–3 seeds into the top of the medium, 1/4 inch deep; mist the surface daily until germination, then let the wick handle moisture delivery from below
- Seedlings: make a small depression in the center, place the seedling root ball, and backfill gently; water the medium from the top once to establish moisture before the wick takes over fully
Best for Wick system growing medium base
Burpee Organic Premium Coco Coir Growing Medium
pH-buffered, pre-rinsed coco coir that expands from a compressed brick to 2 gallons. Mixes evenly with perlite for a wick-ready growing medium without extra flushing needed. Widely available and consistently quality.
★★★★★ 4.6 · 2,100 reviews
Check current price on Amazon→Step 4: Mix and add the nutrient solution
Nutrient concentration in wick systems should run slightly lower than in active hydroponic systems. The slow, steady delivery rate means roots stay in continuous contact with the solution in the medium, so high concentrations can cause salt accumulation around roots over time.
Recommended starting concentrations by plant type:
| Plant Type | EC Target | Dilution from Label Rate |
|---|---|---|
| Herbs (basil, cilantro, mint) | 0.8–1.2 mS/cm | 40–60% of label rate |
| Lettuce and spinach | 1.0–1.4 mS/cm | 50–70% of label rate |
| Arugula and kale | 1.2–1.6 mS/cm | 60–80% of label rate |
| Strawberries | 1.4–1.8 mS/cm | 70–90% of label rate |
Mixing procedure:
- Start with room-temperature water in a clean bucket
- Add nutrient concentrate at the appropriate dilution rate — always add nutrients to water, not water to concentrated nutrients
- Stir until fully dissolved
- Test pH and adjust to 5.8–6.2 using pH Up or pH Down — add a few drops at a time, stir, and retest
- Pour into the reservoir to a depth of 2 to 3 inches — enough for the wicks to reach but not so much that liquid touches the bottom of the growing container
Best for Single-part nutrient solution for wick system herbs and greens
General Hydroponics MaxiGro Plant Food
A dry, soluble single-part nutrient that mixes cleanly with no sediment — ideal for wick systems where undissolved particles can clog wick fibers. Dissolves in seconds and covers all essential macro and micronutrients for leafy greens and herbs.
★★★★★ 4.7 · 4,800 reviews
Check current price on Amazon→Step 5: Position the grow light
Most herbs and leafy greens need 14–16 hours of light per day to produce at an indoor-productive rate. A south-facing window with 6 or more hours of direct sunlight can sometimes work, but supplemental LED lighting gives more consistent results year-round regardless of season or window orientation.
Light intensity targets for wick-system crops:
- Herbs (basil, cilantro, mint): 200–400 µmol/m²/s PPFD
- Lettuce and spinach: 150–300 µmol/m²/s PPFD
- Arugula and compact kale: 250–450 µmol/m²/s PPFD
For a countertop wick system with 2–4 herb plants, a 20–45W LED positioned 10–18 inches above the canopy provides enough intensity. For a larger multi-plant setup, a 100W LED quantum board covers a 2 x 2 foot footprint. A plug-in timer set to 16 hours on, 8 hours off eliminates one more daily task.
Best for Small wick system setups with 1 to 4 herb plants
Juhefa Dual Head LED Grow Light
Clip-on dual-head LED with a flexible gooseneck for precise canopy positioning. Covers a 2 to 4 plant desktop setup and includes a built-in timer. Low heat output keeps the growing medium from drying out faster than wicks can replenish it.
★★★★★ 4.5 · 6,300 reviews
Check current price on Amazon→Best plants for a wick system
| Crop | Reservoir Volume | Wick Count | Days to First Harvest |
|---|---|---|---|
| Basil | 1 gallon | 1 | 28–35 days from seedling |
| Cilantro | 1 gallon | 1 | 25–35 days |
| Mint | 1 gallon | 1 | 30–45 days |
| Loose-leaf lettuce | 1.5 gallons | 1–2 | 30–40 days |
| Spinach | 1.5 gallons | 1–2 | 35–45 days |
| Arugula | 1 gallon | 1 | 25–35 days |
| Green onions | 1 gallon | 1 | 21–28 days |
| Strawberries | 2 gallons | 2–3 | 60–90 days |
Strawberries are the heaviest feeder on this list and push the limits of wick delivery — use 2 or 3 wicks and the higher end of the EC range. Most wick system growers get the best results starting with basil or loose-leaf lettuce, where the match between plant nutrient demand and wick delivery rate is ideal.
What to skip in a wick system
Tomatoes, peppers, cucumbers, and other fruiting plants need more nutrients than passive wicks can deliver consistently. In active systems such as deep water culture or drip, nutrient-rich solution circulates continuously through the root zone. Wicks replace this circulation with a slow, passive draw — adequate for leafy greens and herbs with EC demands below 1.6 mS/cm, insufficient for heavy-feeding fruiting plants that push demands above 2.0 mS/cm.
If you want to grow tomatoes or peppers hydroponically with minimal equipment, the Kratky method in a dedicated 5-gallon bucket gives faster nutrient delivery while still requiring no active pump.
Maintaining your wick system
Weekly tasks:
- Check solution level in the reservoir and top off when the level drops more than 1 inch below the starting mark
- Mix fresh nutrient solution at the same dilution rate and adjust pH to 5.8–6.2 before adding
- Press a finger 1 inch into the growing medium — if it feels dry, the wick may need adjustment or replacement
Every 4–6 weeks:
- Do a full reservoir flush: drain completely, rinse the reservoir and wick, and refill with fresh nutrient solution
- Inspect wicks for mineral crust or dark discoloration — stiff, crusty wicks no longer wick efficiently and should be replaced
- Rinse the growing medium from the top with pH-adjusted water to flush accumulated mineral salts
Wick replacement: Cut a new wick to the same length as the original and thread it through the same holes alongside the old wick. Once the new wick is seated correctly, pull the old one out gently. No need to remove the plant or disturb the root zone.
Troubleshooting common wick system problems
Plant wilting with a full reservoir: The wick is not delivering solution fast enough. Check that the tip is fully submerged (not resting on the surface), that the wick is not kinked, and that you are using enough wicks for the plant size. Clogged wicks should be replaced.
Yellow leaves despite correct pH: EC may be too low — the solution is too dilute to meet plant needs at the wick delivery rate. Increase EC by 0.2 mS/cm on the next reservoir refill, then monitor for 5–7 days.
Algae in the reservoir: Light is reaching the nutrient solution. Wrap all clear container surfaces in black tape or foil. Once algae establishes, drain completely, scrub with a 1:10 bleach solution, rinse thoroughly, and refill with fresh nutrients.
Growing medium staying too wet: The wick is drawing solution faster than the plant can use it. This typically happens in low-light conditions where the plant is not photosynthesizing or transpiring actively. Increase light intensity or duration, or reduce from 2 wicks to 1 wick for small herb plants.
FAQ
Frequently asked questions
How is a wick system different from the Kratky method?
What is the best wick material for hydroponics?
How often do I need to change the nutrient solution in a wick system?
Can I use potting soil in a wick system?
How many plants can one wick reservoir support?
Do I need to add an air stone or pump to a wick system?
Bottom line
A wick hydroponics system is the most accessible entry point into soilless growing — no pump, no reservoir timer, no complex plumbing. For small herb gardens and leafy greens, it delivers steady moisture and nutrients with minimal weekly intervention. A first harvest of basil or loose-leaf lettuce is typically 4 to 6 weeks from setup.
Three fundamentals drive results: use nylon or thick cotton wicks with the tip fully submerged in the reservoir, maintain pH at 5.8–6.2, and grow plants that match the wick delivery rate — herbs, compact greens, and small fruiting plants like strawberries. Get those right and the system manages itself between weekly top-offs.
For more passive and beginner hydroponics: how to set up a Kratky system, best hydroponic nutrients, how to start a hydroponic herb garden, and hydroponics vs soil.