guides
How to Set Up a Kratky Hydroponics System
Set up a Kratky hydroponics system in under an hour. No pumps or electricity needed — just a container, nutrients, and net pots for herbs and greens.
 Priya Anand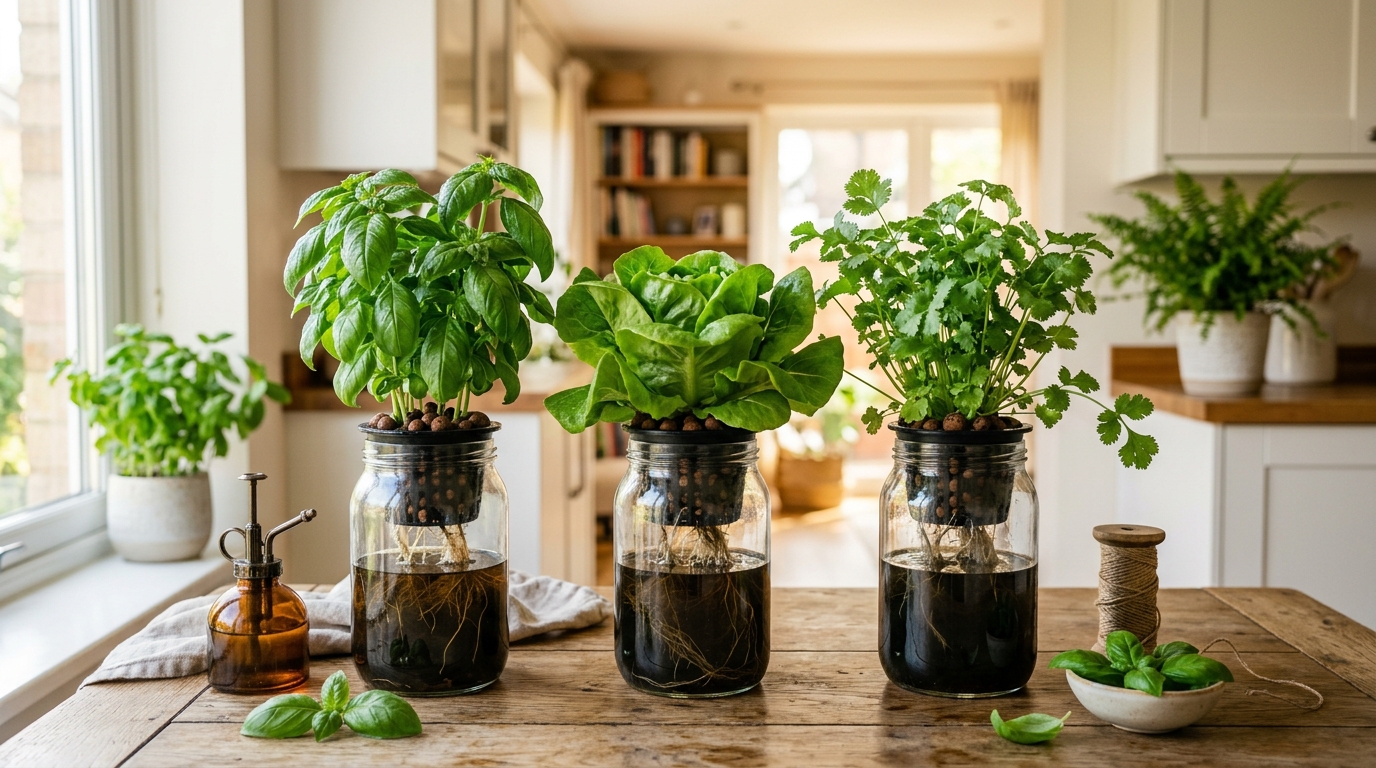
Set up a Kratky system in four steps: fill a dark container with nutrient solution (EC 1.2–1.6, pH 5.8–6.0), install net pots packed with clay pebbles and seedlings, leave a 1–2 inch air gap between the waterline and net pot bottom, then add light. No pump, no timer for the reservoir. Lettuce and basil are ready in 3–4 weeks.
What is the Kratky method and why does it work?
The Kratky method was developed by Dr. B.A. Kratky at the University of Hawaii as a low-cost alternative to active hydroponic systems. The core insight is simple: as the plant consumes nutrient solution, the water level drops and an air gap forms between the bottom of the net pot and the solution surface. This gap allows oxygen-starved water roots to convert into air roots — the thicker white roots that absorb oxygen directly from air rather than water.
In an active DWC system, an air pump keeps dissolved oxygen levels high enough to sustain fully submerged roots. In Kratky, the air gap replaces the pump entirely. The plant self-regulates this gap by consuming solution at its own pace. As long as you start with the correct water level and top off the reservoir as needed, the system maintains itself.
Kratky works best for:
- Leafy greens and herbs with short grow cycles of 3–6 weeks
- Single-plant mason jar setups or multi-plant storage tote builds
- Growers who want minimal maintenance between refills
Where Kratky struggles:
- Heavy-feeding fruiting plants like tomatoes and peppers — they deplete nutrients faster than leafy greens and benefit from active aeration
- Hot environments where solution temperatures rise above 75°F, increasing root disease risk
- Very large reservoirs with many plants, where nutrient imbalances are harder to detect without regular monitoring
What you need to set up a Kratky system
| Product | Best for | Rating | Notes | |
|---|---|---|---|---|
| Wide-mouth mason jars or opaque storage container | Single plants (jar) or 6 to 12 plants (tote) | ★★★★★ | A quart mason jar works for one small herb or lettuce plant. For multiple plants, a 5 to 10 gallon dark storage tote with holes cut in the lid handles 6 to 12 net pots. Dark containers prevent algae growth in the nutrient solution. | Check price |
| Net pots (2-inch for herbs, 3-inch for lettuce) | Suspending plants above the nutrient solution | ★★★★★ | Net pots hold growing medium and plant roots while letting roots grow down into the solution. A 100-pack of 2-inch net pots costs under $10 and fits standard wide-mouth mason jar openings without modification. | Check price |
| Hydroponic nutrient solution (two-part or three-part) | Providing all macro and micronutrients in one mix | ★★★★★ | General Hydroponics MaxiGro is a popular single-part option for leafy greens. The Flora Series (Grow, Bloom, Micro) gives more control for different growth stages. Mix at half-strength for lettuce and herbs. | Check price |
| pH meter or pH test kit | Verifying solution pH before adding plants | ★★★★★ | A digital pH meter like the Apera PH20 gives fast accurate readings. Liquid test kits work but add 5 minutes per test. pH pens in the $15 to $30 range are accurate enough for home Kratky setups. | Check price |
| pH Up and pH Down solutions | Adjusting solution pH to the 5.5 to 6.2 target range | ★★★★★ | General Hydroponics pH Up and pH Down are the standard. A small bottle of each lasts months for home growers. Add pH Down (phosphoric acid) to lower; add pH Up (potassium hydroxide) to raise. | Check price |
| Clay pebbles (hydroton) or rockwool starter cubes | Anchoring plants and supporting roots in net pots | ★★★★★ | Rinsed clay pebbles fill net pots and anchor plants while keeping the root zone aerated. Rockwool starter cubes are better for germinating seeds before transplanting into net pots. Both are reusable after sterilizing. | Check price |
A single-jar Kratky setup costs under $30 including nutrients, pH adjuster, and a pack of net pots. A multi-plant tote setup for 6–8 plants runs $60–100 including a small LED grow light.
Step 1: Choose and prepare your container
Container selection sets the scale of the system. Dark, food-safe containers are the baseline requirement — dark to block light from reaching the nutrient solution, food-safe because plants will absorb whatever leaches from the container walls.
Single plant (mason jar): A wide-mouth quart jar works for one lettuce head, basil plant, or herb. A 2-inch net pot sits directly in the jar mouth without any modification. Cover the outside of clear glass jars with black electrical tape or aluminum foil to prevent light from reaching the solution below.
Multiple plants (storage tote): A 10-gallon dark storage tote with a lid supports 6–10 plants. Cut or drill 3-inch holes in the lid spaced 4–6 inches apart. The larger reservoir volume means the solution stays balanced longer between refills — a meaningful advantage for beginners who may not check daily.
Container preparation:
- Wash the container with dish soap and rinse thoroughly
- For clear containers, wrap the outside with black tape or a black plastic bag to block all light
- Mark the outside of the container at the correct fill level before adding solution — the waterline should sit 1–2 inches below the bottom of the net pot opening
The 1–2 inch air gap is the single most important setup parameter in Kratky. Too large a gap at the start and roots cannot reach the solution; too small a gap and the entire root mass stays submerged with no access to oxygen.
Step 2: Mix your nutrient solution
Hydroponic nutrients dissolve in plain water and provide every element plants need — nitrogen, phosphorus, potassium, calcium, magnesium, and trace minerals. Start at EC 1.2–1.6 mS/cm for leafy greens and herbs, which equals roughly half-strength on most nutrient schedules designed for heavier crops.
Mixing steps:
- Start with plain tap or filtered water in a separate container
- Add nutrient concentrate per the manufacturer label — typically 5 mL per gallon at half-strength for liquid nutrients
- Stir thoroughly until fully dissolved
- Do not adjust pH yet — always add nutrients to water first, then test and adjust pH after mixing
Water quality tip: Tap water above 300 ppm total dissolved solids can interfere with nutrient ratios. If you have very hard tap water, reverse osmosis or filtered water gives a cleaner starting baseline. Rainwater also works well.
Best for Complete three-part nutrient system for all growth stages
General Hydroponics Flora Series Starter Kit
The standard for home hydroponic growers. FloraGro, FloraBloom, and FloraMicro cover every growth stage, and the starter kit includes pH Up and pH Down so you have the full setup in one order.
★★★★★ 4.8 · 3,200 reviews
Check current price on Amazon→Step 3: Adjust pH to the correct range
pH is the single most common reason Kratky systems underperform. Nutrients become chemically unavailable to plants outside the correct pH range even when they are present in solution — a condition called nutrient lockout that can stall a plant within days.
Target pH for Kratky: 5.5–6.2
The practical sweet spot for most leafy greens and herbs is 5.8–6.0. At this range, all major nutrients are available simultaneously with no lockout.
How to adjust pH:
- Measure the pH of your freshly mixed nutrient solution
- If pH is above 6.2: add pH Down a few drops at a time, stir, and retest
- If pH is below 5.5: add pH Up a few drops at a time, stir, and retest
- Make adjustments in small increments — pH solutions are concentrated and overshoot happens quickly
- Retest after 30 seconds of stirring; pH stabilizes fast in most solutions
pH drift over time: In a Kratky system, pH naturally drifts as plants consume specific nutrients. Check pH each time you top off the reservoir — typically every 7–14 days for leafy green setups. A drift of 0.2–0.3 pH units between checks is normal. Anything beyond 0.5 units warrants immediate adjustment.
Best for Fast, accurate pH readings for home hydroponics
Apera Instruments PH20 Value pH Tester
Reads pH in seconds, has automatic temperature compensation, and the probe is replaceable. More reliable than test strips or drops and accurate enough for any home Kratky or DWC setup.
★★★★★ 4.7 · 5,800 reviews
Check current price on Amazon→Step 4: Fill the net pots with growing medium
Clay pebbles (hydroton) are the standard growing medium for Kratky net pots. They support roots physically, keep the root zone aerated, and are pH-neutral — they will not alter solution chemistry after rinsing.
Preparing clay pebbles:
- Rinse clay pebbles in a colander under running water until the water runs clear — new pebbles are dusty and the dust can temporarily lower solution pH
- Optionally soak rinsed pebbles in pH-adjusted water for 30–60 minutes before use
- Fill net pots about halfway with pebbles
Starting from seeds (direct sow):
- Place a rockwool starter cube or small wad of wet paper towel in the center of the net pot
- Drop 2–3 seeds onto the medium
- Cover loosely with a small handful of clay pebbles
- Keep the top of the medium moist during germination by misting daily or using a humidity dome over the jar for the first few days
Starting from seedlings (transplant):
- Germinate seeds in rockwool cubes or small soil plugs first
- Once the seedling has its first true leaves and visible root tips, place the seedling-plus-cube into the net pot
- Fill around the cube with clay pebbles up to the net pot rim
- Roots will grow through the cube into the nutrient solution within 3–5 days
Step 5: Fill the reservoir and assemble
With net pots prepared, it is time to fill the reservoir and complete the assembly.
Filling procedure:
- Pour pH-adjusted nutrient solution into the container
- Fill until the solution surface sits 1–2 inches below the bottom of the net pot
- Place the loaded net pots into position
- Confirm growing medium is not touching the solution surface at this stage — roots will grow down into it from above, but the starting position needs a clear air gap
For mason jars: fill to about 0.5 inch below the bottom of the net pot. For storage totes: fill until the solution surface is 1–2 inches below where net pot bottoms will sit when loaded into the lid.
Initial moisture for new seedlings: Young plants need moisture at the top of the net pot while roots grow down to reach the solution. For the first 2–3 days, mist the clay pebbles once or twice daily, or use a pipette to wet the growing medium at the net pot level. Once roots contact the solution and the plant begins drawing water on its own, active wetting stops and the system becomes fully passive.
Step 6: Position your grow light
Kratky systems in a south-facing window with direct sunlight can grow without supplemental light. In most indoor situations — north or east-facing windows, basements, closets, or rooms without strong direct sun — a grow light is required for reliable results.
Light requirements for leafy greens:
- Minimum PPFD at canopy: 200–300 µmol/m²/s
- Ideal PPFD: 300–500 µmol/m²/s
- Light schedule: 14–16 hours per day
A 20–45 watt LED grow light placed 12–18 inches above the plants covers 1–4 mason jar plants effectively. For a full 10-gallon tote with 6–10 plants, a 100–150 watt quantum board panel is a better fit.
Best for Kratky tote setups with 4 to 8 plants
Spider Farmer SF-1000 LED Grow Light
Draws 100W from the wall, uses Samsung LM301B diodes, and covers a 2x2 ft footprint for leafy greens and herbs. Runs cool and quiet — well-suited to a countertop or shelf Kratky setup.
★★★★★ 4.7 · 7,500 reviews
Check current price on Amazon→Step 7: Monitor and top off the reservoir
Once running, the main ongoing task is checking solution levels and topping off with fresh nutrient solution as needed.
Monitoring schedule:
- Days 1–7: Check solution level every 2–3 days while roots are establishing
- After roots reach the solution: check every 5–7 days
- Top off when the level drops more than 2 inches below the starting mark
How to top off correctly:
- Mix a fresh batch of nutrient solution at the same concentration as the original
- Adjust pH to 5.8–6.0
- Add solution slowly without disturbing roots — pour against the container wall
- Do not overfill — maintain the existing air gap between the waterline and net pot bottom
- Note the date and volume added; this helps track plant consumption rate
When to replace solution entirely: For grows longer than 6 weeks, do a full reservoir change every 4–6 weeks. Drain completely, rinse the container, and refill with fresh nutrient solution. For short-cycle crops like lettuce and basil at 3–4 weeks, the plants typically finish before the solution degrades significantly.
Troubleshooting common Kratky problems
Yellowing lower leaves (nitrogen deficiency) Solution EC is too low or pH is out of range. Check pH first — if correct, mix the next top-off batch at slightly higher concentration (1.6–2.0 mS/cm). Lower-leaf yellowing is normal as the plant ages, but rapid yellowing of new growth signals a nutrient problem.
Slimy brown roots (root rot) Caused by high water temperature and low dissolved oxygen. Keep solution temperature below 72°F. In a passive Kratky setup, the air gap is the only defense — if roots are fully submerged with no gap, lower the solution level to restore it. Adding a small airstone temporarily while roots recover is a practical fix.
Algae in the reservoir Light is reaching the nutrient solution through gaps or clear container walls. Cover all clear surfaces. Once algae establishes, drain and scrub the container with a 1:10 bleach solution, rinse thoroughly, and refill with fresh nutrients.
Plants wilting with a full reservoir Roots may be entirely submerged with no air gap. This is the most common Kratky setup error. Lower the solution level to restore the gap. Use a turkey baster to remove solution if you overfilled.
Stunted growth or purple leaf undersides Phosphorus deficiency from pH drift or cold solution temperatures. Raise solution temperature to 65–72°F if cold is the cause. Adjust pH to 5.8–6.0 if it has drifted outside range.
What plants grow best in a Kratky system?
| Crop | Container Size | Days to Harvest | Notes |
|---|---|---|---|
| Loose-leaf lettuce | Quart mason jar | 25–35 days | Most forgiving Kratky crop; low nutrient demand |
| Basil | Quart mason jar | 30–40 days | Run light schedule at 16 hours for best leaf density |
| Spinach | Quart mason jar | 30–40 days | Prefers slightly cooler temps of 60–70°F |
| Arugula | Quart mason jar | 25–35 days | Harvest outer leaves for continuous yield |
| Cilantro | Quart mason jar | 30–40 days | Bolt-resistant when temps stay below 75°F |
| Kale | Half-gallon jar or tote | 40–55 days | Needs 3-inch net pot and more reservoir volume |
Fruiting plants like tomatoes and peppers can work in Kratky but need much larger reservoirs — a full 5-gallon bucket per plant — plus regular monitoring and ideally active aeration. Stick to leafy greens for your first few Kratky cycles.
FAQ
Frequently asked questions
How often do I need to check on a Kratky system?
Can I reuse Kratky solution for the next grow?
Do I need an air pump for a Kratky system?
How big of a container do I need for one lettuce plant?
What nutrient EC should I use for Kratky lettuce?
Why are my Kratky plants growing slowly?
Bottom line
The Kratky method is the most beginner-accessible hydroponic system available — no pumps, no reservoir timers, no complex plumbing. A mason jar, clay pebbles, hydroponic nutrients, and a pH adjuster are all you need to grow lettuce or basil faster than soil.
Get the pH right (5.8–6.0), maintain the air gap (1–2 inches between waterline and net pot), and provide enough light (14–16 hours per day). Everything else — monitoring, topping off, adjusting nutrients — follows from those three fundamentals. Most beginners have their first lettuce harvest within 30 days of setup.
For more hydroponics guidance: how to start a hydroponic herb garden, how to prevent root rot in hydroponics, DIY hydroponics guide, and hydroponics vs soil.